We’ve already introduced you to our new DXOMARK Selfie test protocol for smartphone front cameras. In this article, we want to dive a little deeper and explain in more detail how we test front cameras to give you a better understanding of our approach and methodology. We’ll start out with some general information about our testing methods and how the overall score is generated, and then provide more in-depth information about how we test for the individual sub-scores.
Testing and scoring
As with our DXOMARK Camera protocol, DXOMARK also tests front cameras using the default modes of firmware versions. In the process of testing a front camera, our engineers capture more than 1500 sample images and several hours of video of test charts and scenes in the DXOMARK image quality laboratory, as well as a variety of indoor and outdoor “real-life” scenes in and around DXOMARK headquarters near Paris. To test repeatability and consistency of results, we always take a series of images of the same test scene, rather than just individual shots.
While our front camera testing is very similar to our DXOMARK Camera protocol for smartphone main cameras, we have made some important modifications to take into account the way people primarily use front cameras. People capture selfies outdoors in bright light or indoors under many types of artificial lighting, and by definition show at least one human subject—the photographer herself or himself—in the image, which is why manufacturers should ideally optimize front cameras for portraiture at relatively short shooting distances and in a variety of lighting situations.
There are also image quality aspects for the front camera that are unique to video. Video stabilization is an important attribute that has a big impact on the overall quality of a video recording. The same is true for continuous focus, as an unstable autofocus can easily ruin an otherwise good clip. The most crucial difference between still image and video testing, however, is the addition of a temporal (time) dimension to most other image quality attributes. The tests for most static attributes that look only at a single frame of a video clip—for example, target exposure, dynamic range, or white balance—are pretty much identical to the equivalent tests for still images. However, a video clip is not a single static image but rather many frames that are recorded and played back in quick succession. We therefore also have to look at image quality from a temporal point of view—for example, how stable are video exposure and white balance in uniform light conditions? How fast and smooth are exposure or white balance transitions when light levels or sources change during recording?
It is also worth noting that for video testing we manually select the resolution setting and frame rate that provides the best video quality, while for stills we always test at the default resolution. For example, a smartphone front camera might offer a 4K video mode but use 1080p Full-HD by default. In these circumstances, we will select 4K resolution manually.
Subject distance and variation
Subject distance is very important in Selfie testing, but obviously, it can vary: some users like to capture close-up portraits of the face. In this kind of image, the attention tends to be focused on the subject and the rendering of the background is pretty much irrelevant. Another typical use case is a self-portrait taken at arm’s length. In this type of selfie, the subject is still the most prominent feature, but the background contains elements that the user wants to capture—for example, city sights or natural features in a landscape. Further, many users like to mount their smartphones on selfie-sticks in order to capture as much of the background scenery as possible, so the background should be just as well-exposed and sharp as the subject(s) in the foreground in the image.
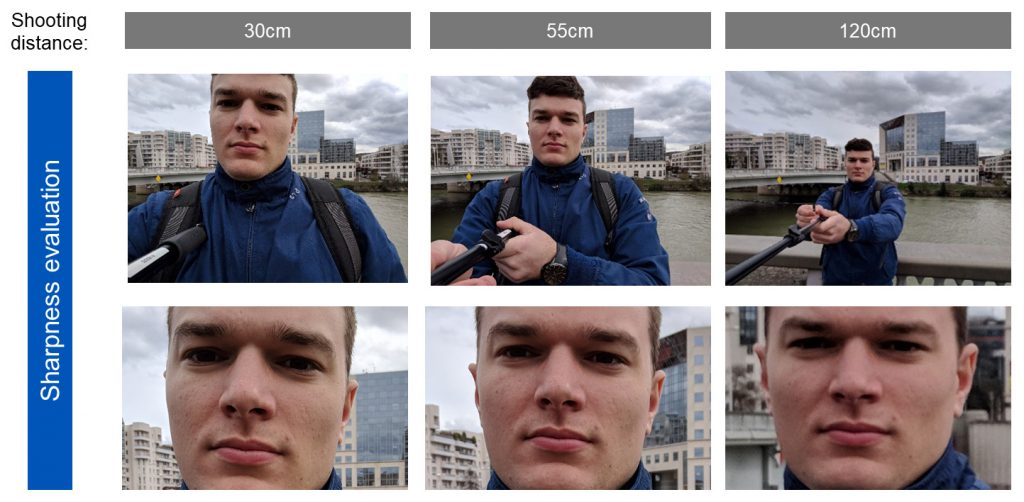
To cover these most-typical front camera use cases, we perform our DXOMARK Selfie tests at three different subject distances:
- 30cm, close-up portrait
- 55cm, portrait
- 120cm, portrait with landscape (shot with selfie-stick)

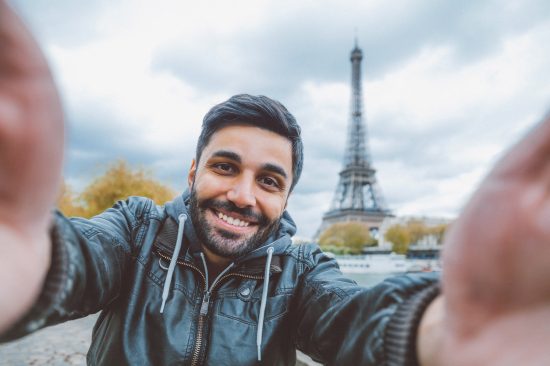

It is a real challenge for most front cameras to produce good image quality at all three of these subject distances, mainly because focus, exposure, and other camera parameters have to be very well-balanced to achieve good results in such a wide range of shooting situations.
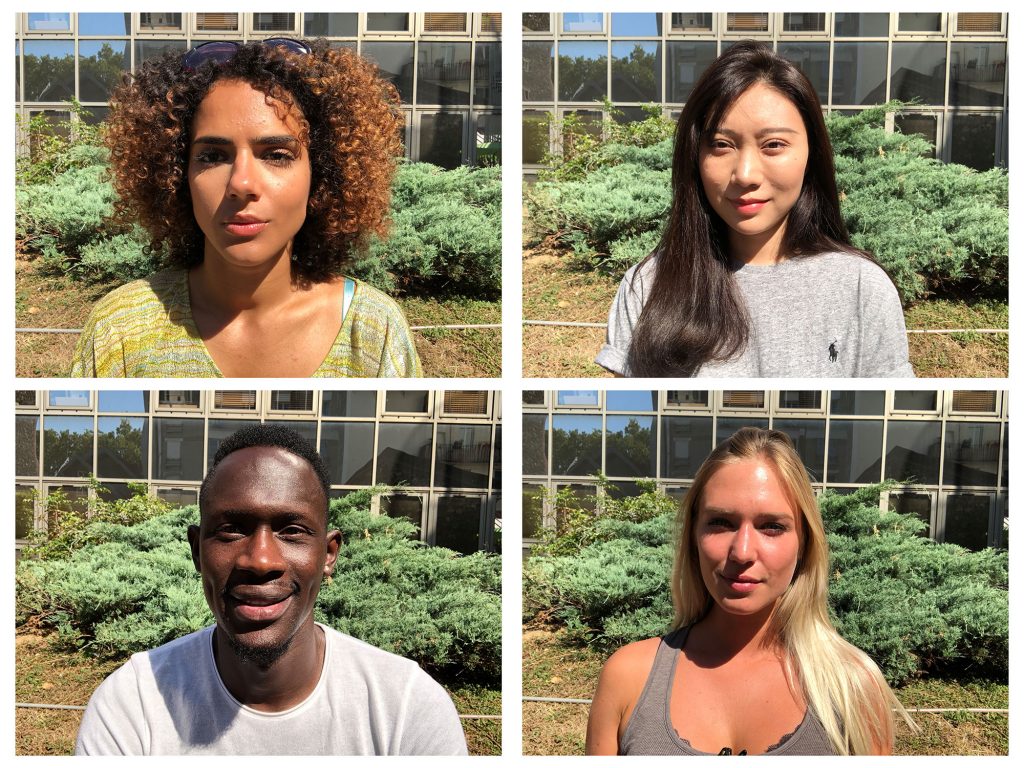
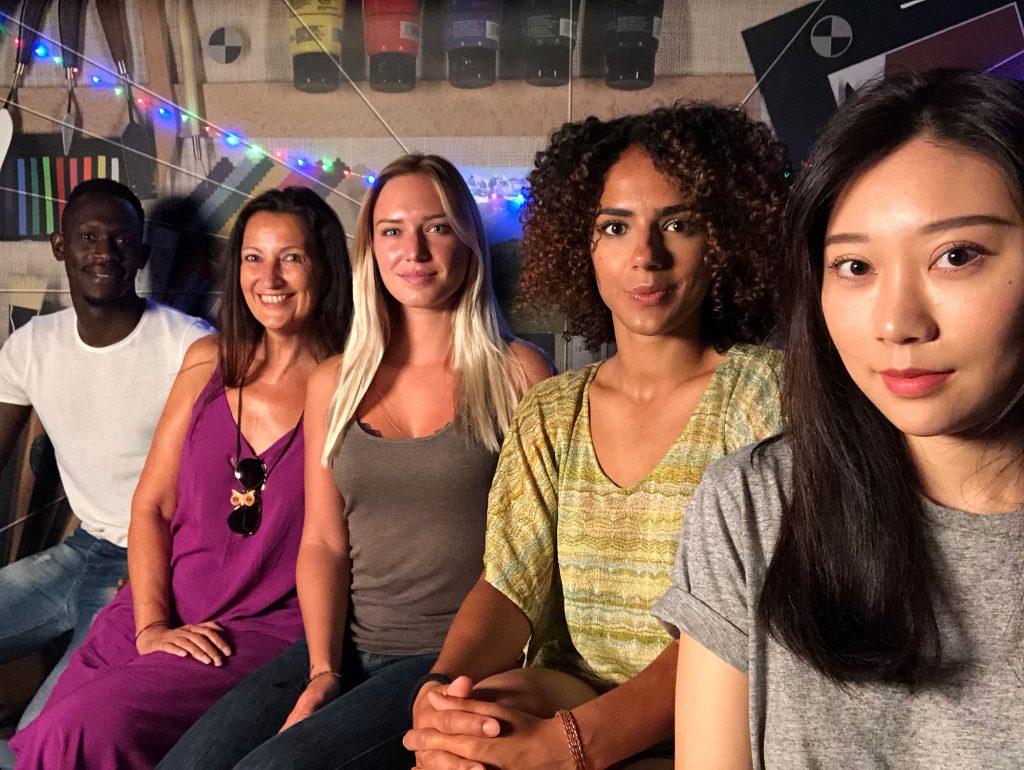
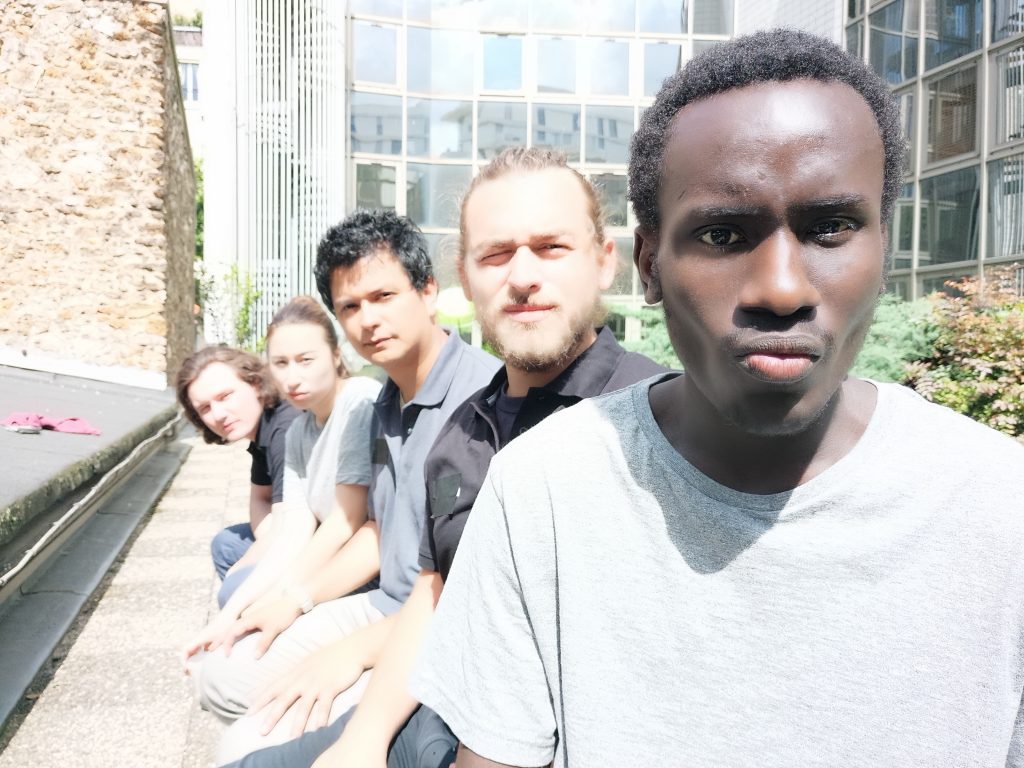
It’s not only the distance between camera and subjects that can vary in selfie photography, of course, given that the subjects themselves can vary in terms of both numbers and skin tones. This is why we create and evaluate test scenes in the studio and outdoors not only with individual subjects but also with groups of people. Shooting group selfies allows us to evaluate how a camera’s focus, white balance, and exposure systems deal with scenes that feature multiple human subjects in several focal planes and with a range of skin tones.
Light conditions
As with our DXOMARK Camera protocol, we perform all lab studio tests at light levels that range from the equivalent of dim candlelight to a very bright sunny day, as follows:
- Outdoor (Bright light, 1000–10000 lux)
- Indoor (typical indoor light conditions, 100–300 lux)
- Low light (typical light conditions in a bar or concert venue at night, 1–20 lux)

We capture our real-life test samples at several outdoor locations on bright and sunny days, as well as inside the DXOMARK offices under typical artificial indoor lighting.
The Selfie score
We generate the DXOMARK Selfie scores from a large number of objective measurements obtained and calculated directly by the test equipment, and from perceptual tests for which we use a sophisticated set of metrics to allow a panel of image experts to compare various aspects of image quality requiring human judgment. We then use a sophisticated set of formulas and weighting systems to condense these objective and perceptual measurements into sub-scores, and then as a last step, we use the sub-scores to compute the Photo and Video scores and the Overall Selfie score.
The DXOMARK Selfie sub-scores
In this section, you can find more detailed information about all the image attributes we are testing and analyzing in order to compute our sub-scores. We’ll also show you some of the custom test equipment we have newly developed for the DXOMARK Selfie protocol in addition to a selection of real-life samples and graphs that we are using to visualize the results.
Exposure and Contrast
Like most of our scores, Exposure and Contrast for still images is computed from a mixture of objective and perceptual measurement. In video, the exposure score looks at target exposure, contrast, and dynamic range from both a static and temporal point of view. When measuring exposure and contrast for selfies, we put a strong emphasis on the target exposure of the face, but we also look at the overall exposure of the image and the HDR capabilities of a camera—all of which can be important when the foreground of a scene is much brighter than the background, or vice versa. We also report if contrast is unusually high or low, but we don’t feed this information into the score, as contrast is mainly a matter of personal taste.
We have developed a dedicated weighting system that we use to compute the Exposure and Contrast sub-score from a large number of perceptual and objective measurements of images taken at different subject distances, based on the following image quality attributes:
- Face target exposure
- Face target exposure consistency across several faces in group selfies
- Overall target exposure
- Highlight clipping on skin tones
- Highlight and shadow detail in the background
When testing video, we have to take temporal image quality attributes as well as static attributes into account. So for Exposure, we test for the following temporal attributes:
- Convergence time and smoothness
- Oscillation time
- Overshoot
- Stability
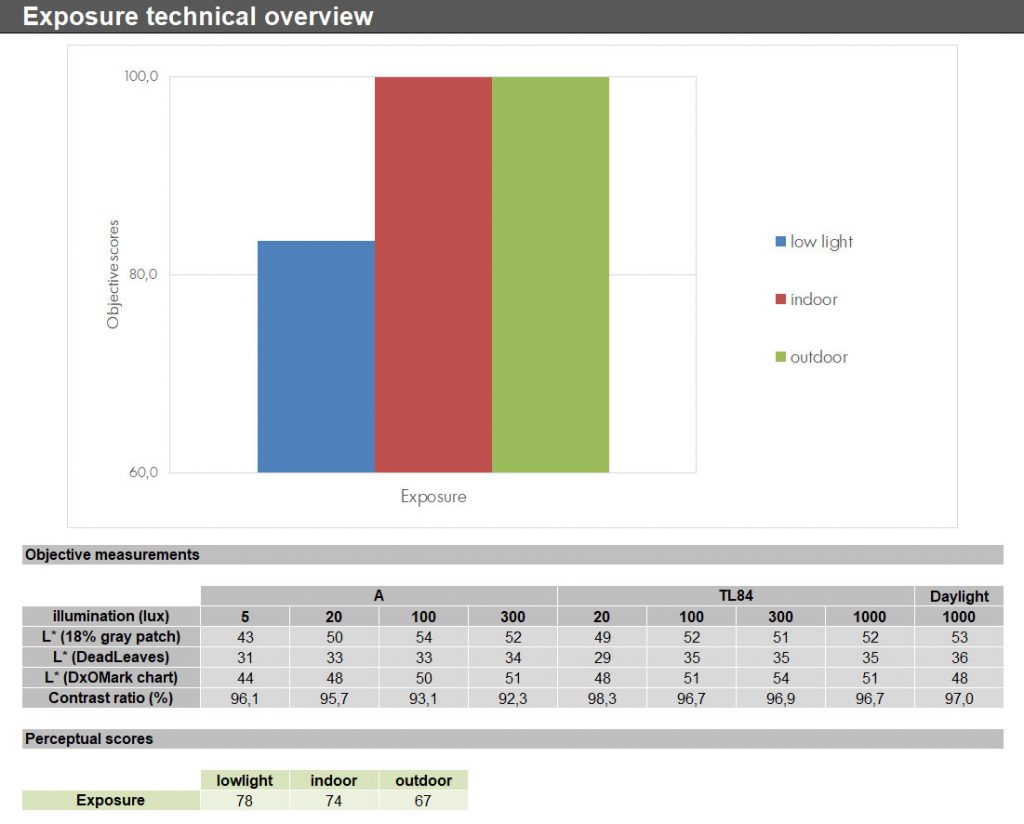
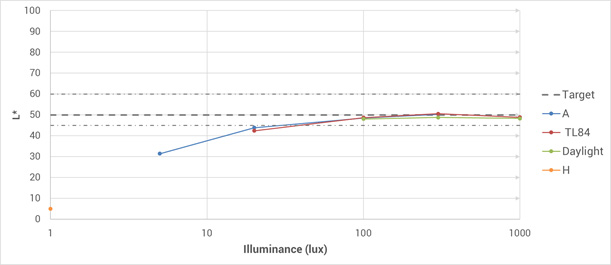
In our in-depth technical reports, we provide an overview of objective measurements (see graph below the left) and perceptual scores. We also prepare a variety of graphs to visualize objective measurements, such as the exposure graph below on the right. It shows target exposure at light levels from 1 to 1000 lux, and for a range of illuminants, including daylight and tungsten.
In addition to the lab tests, we evaluate Exposure and Contrast using our perceptual database of scenes covering different skin tones, subjects distances, lighting conditions and group shots. For example, the Eiffel Tower shot below on the left allows us to check exposure on the face versus the background and tells us a lot about the dynamic range of a camera as the background is brighter than the subject.
We also take sample shots indoors in low light. In the example below on the right, we use lateral lighting to see how well the camera’s exposure system deals with harsh contrasts on a variety of skin tones.

In our perceptual analysis of group selfies, we check the exposure system’s ability to deal with multiple subjects and skin tones in the same scene. In the sample shot below on the left, some highlight and shadow clipping is visible on skin tones, but the camera manages a well-balanced exposure overall. The shot on the right is strongly overexposed, and the exposure system brightened the dark skin tones of the subject in the foreground too much.
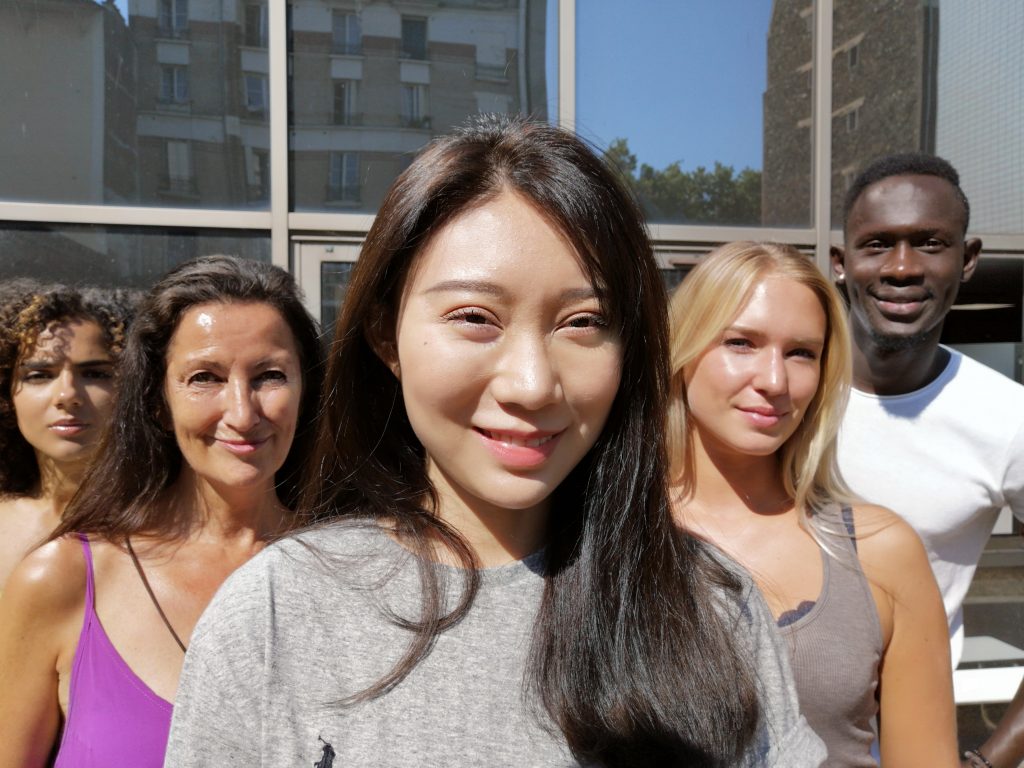
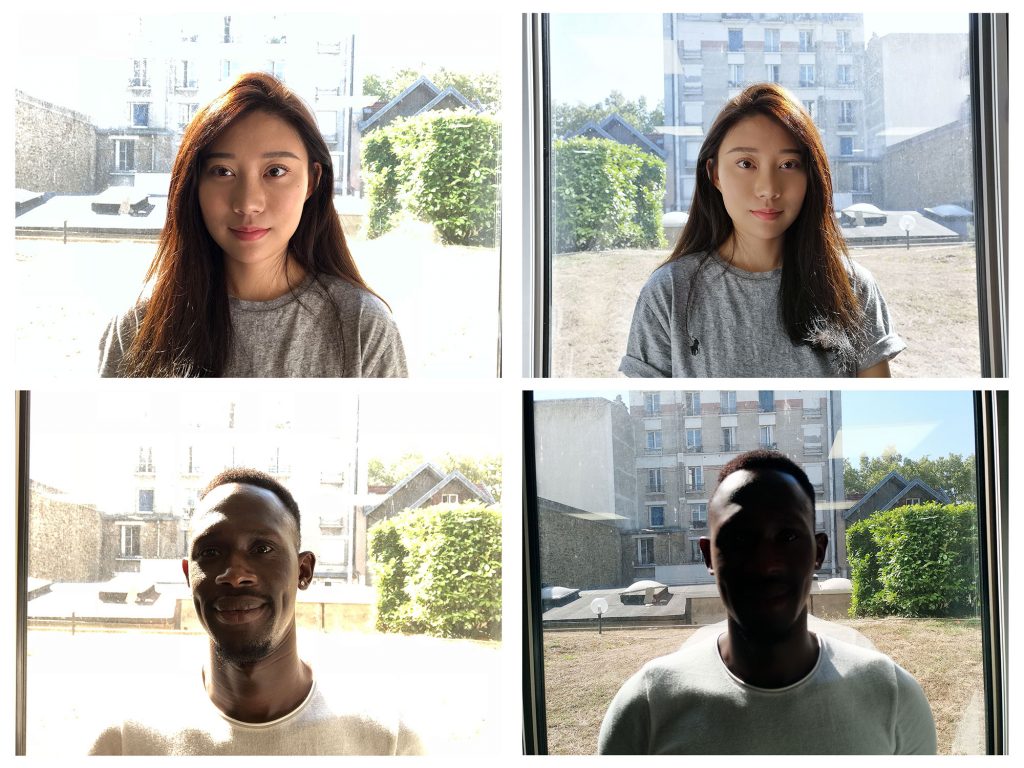
A wide dynamic range is important when trying to avoid highlight or shadow clipping on skin tones or with backgrounds that are much brighter than the image’s subject. In our backlit portrait scenes, we test how the exposure system deals with subjects of varying skin tones in front of a bright background. As usual, face exposure is the top priority, but we also value a good balance between foreground and background exposure. As you can see in the images below on the right, current front camera models deliver very different results in this scene.

Color
When testing color in front camera images, we focus on color on the subject’s face and skin tones, but we also look at the overall color rendering, the white balance, and additional color metrics in the other parts of the frame. For the Color sub-score, we measure and analyze the following image quality attributes:
- White balance accuracy and repeatability
- Color rendering and repeatability
- Skin tone color rendering
- Color shading
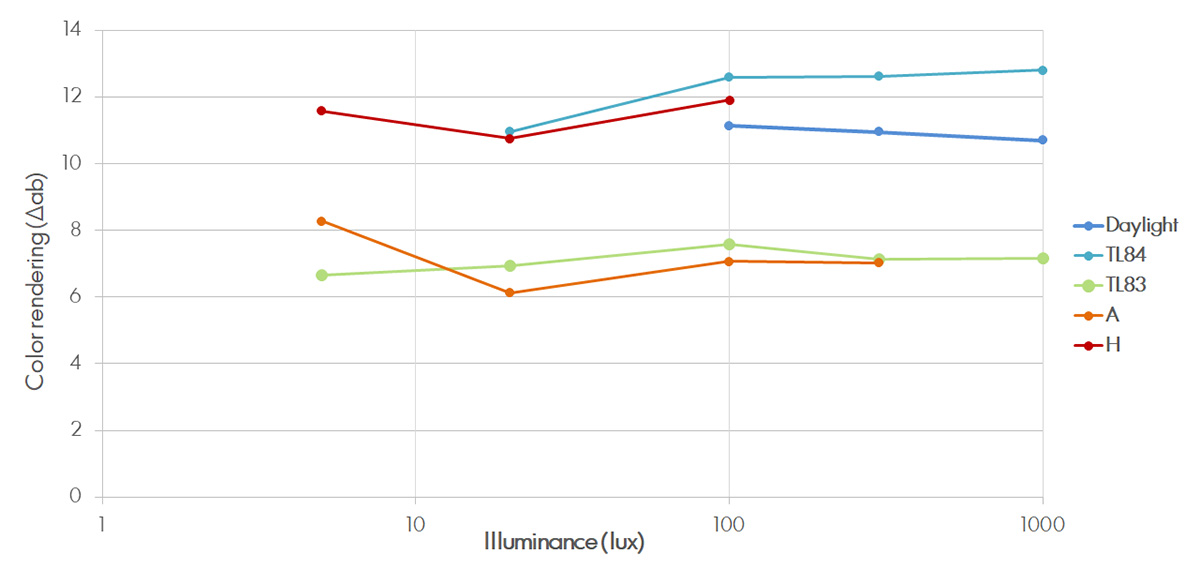
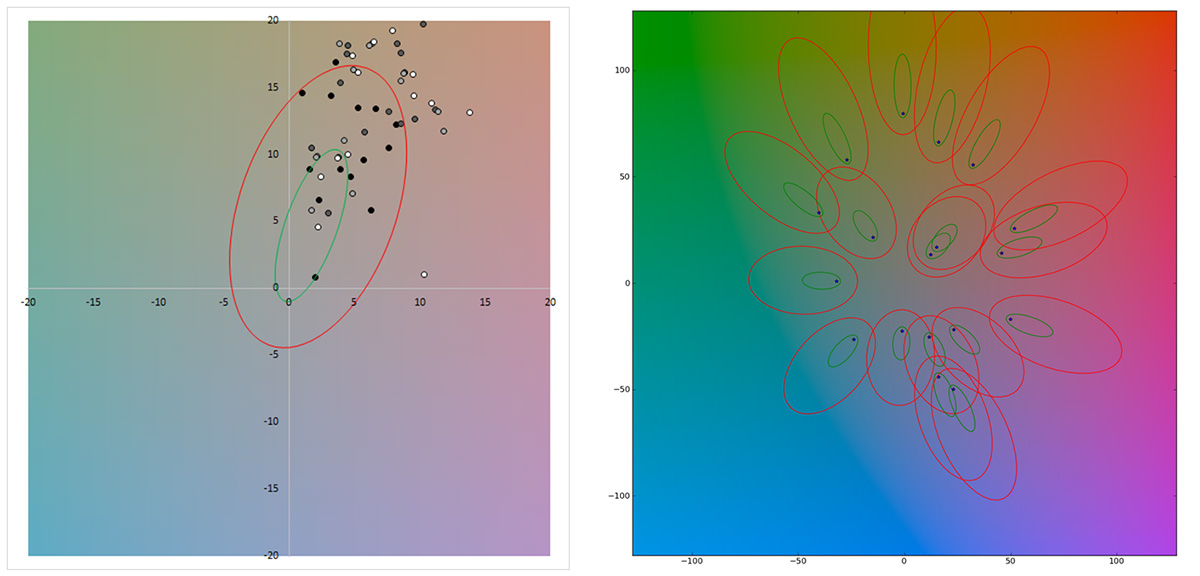
We take objective color measurements using Gretag ColorChecker, Dead Leaves, and our own custom DXOMARK studio charts at different light levels and under different light sources. We produce measurement charts for color rendering, white balance accuracy, and color shading (among others), and have developed an ellipsoid scoring system for evaluating white balance and color saturation. This system takes into account the fact that good and acceptable color manifests on a continuum rather than having a single fixed value. Color tones within the small green ellipsoid (chart below on the right) are close enough to the target color to score maximum points; colors within the larger red ellipsoid are still acceptable, but score lower.
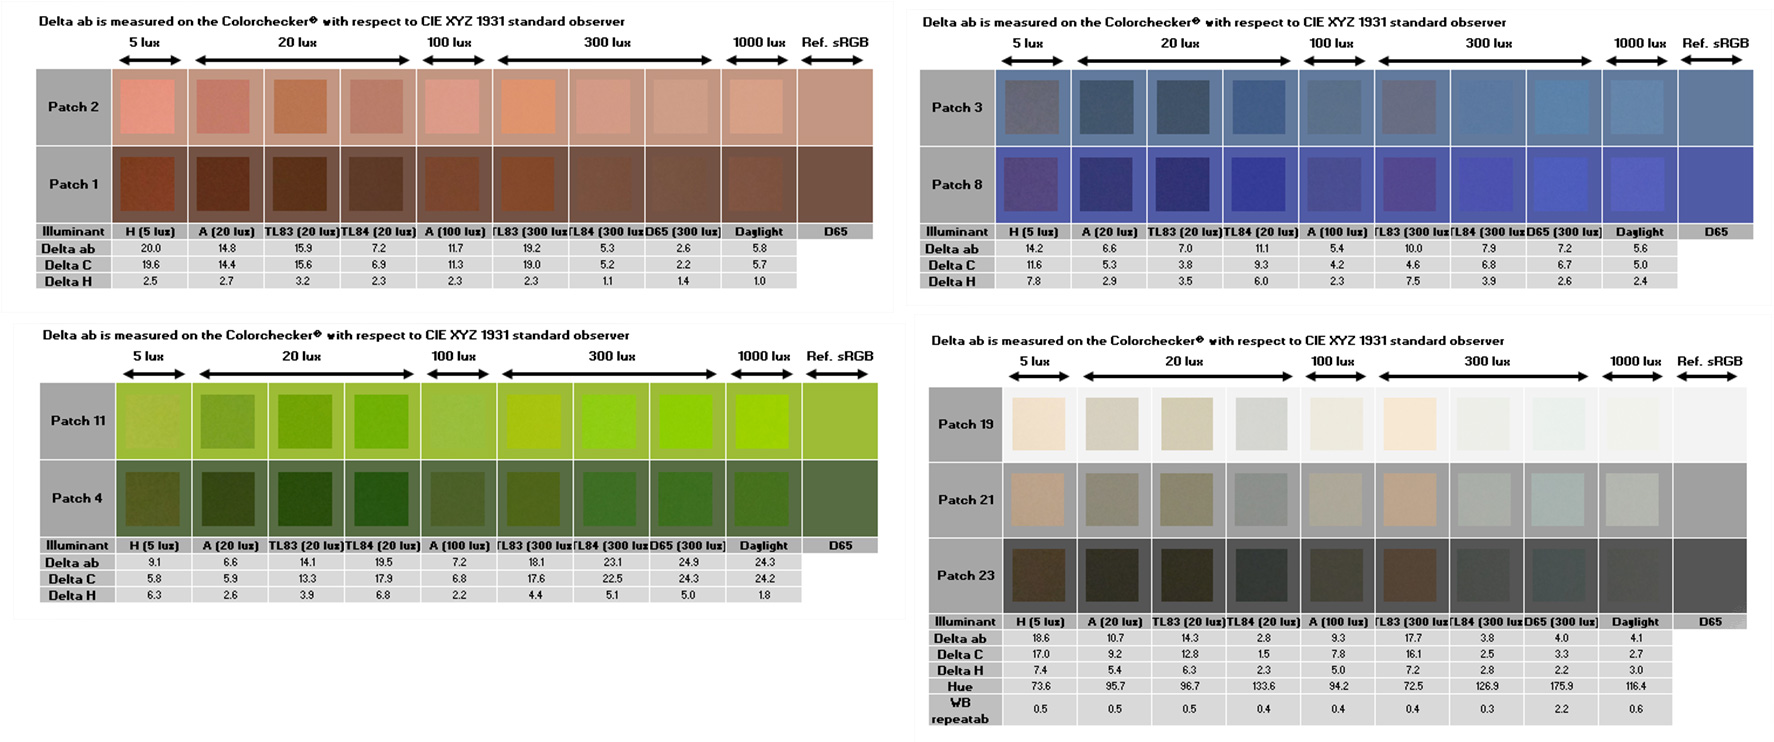
In our in-depth technical reports, we also provide a visual representation of the results, showing the color rendering of the camera (small squares) embedded in the target color (larger squares in the illustration below). This allows us to quickly identify problem areas and opportunities for improvements. As one would expect for our Selfie protocol, our main focus is on skin tone rendering (top-left color array below), but we examine and score the rendering of all tones.
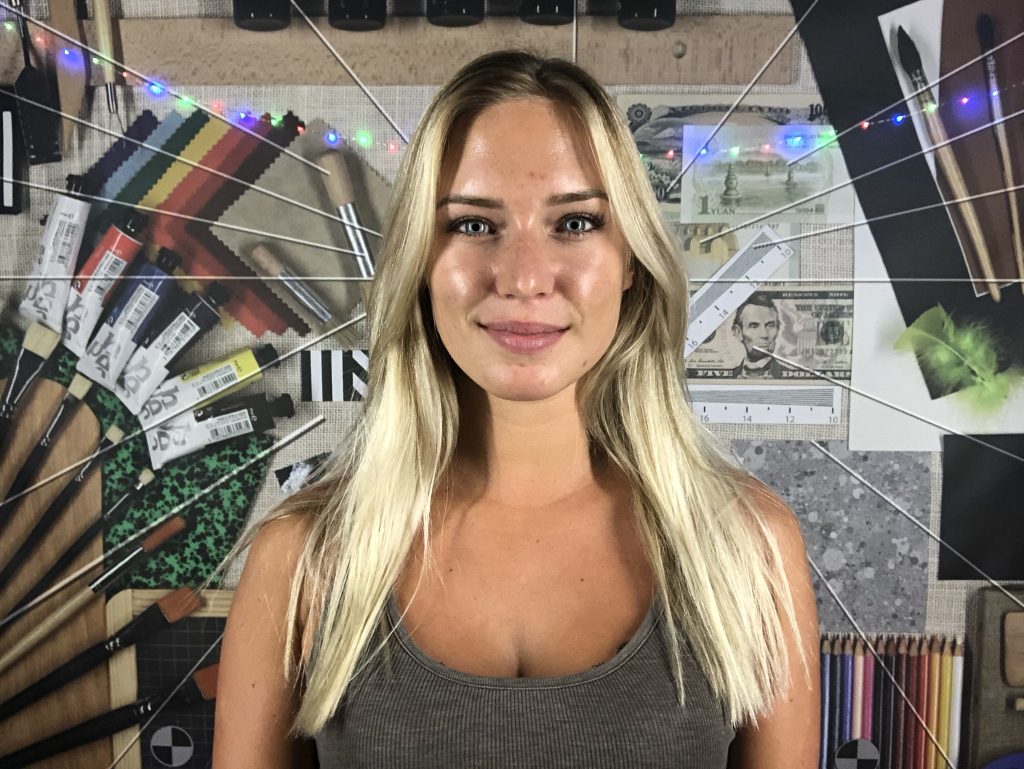
For our perceptual analysis of color, we use many of the same outdoor scenes that we also use to evaluate exposure and other metrics. However, we have also created several color-specific perceptual scenes, such as the indoor setups shown in the images below. The left scene allows us to see how the camera deals with different color light sources in low light. And as white balance systems can be confused by single-colored backgrounds, we designed the scene on the right for use with a range of different-colored backgrounds and artificial lighting.

Focus
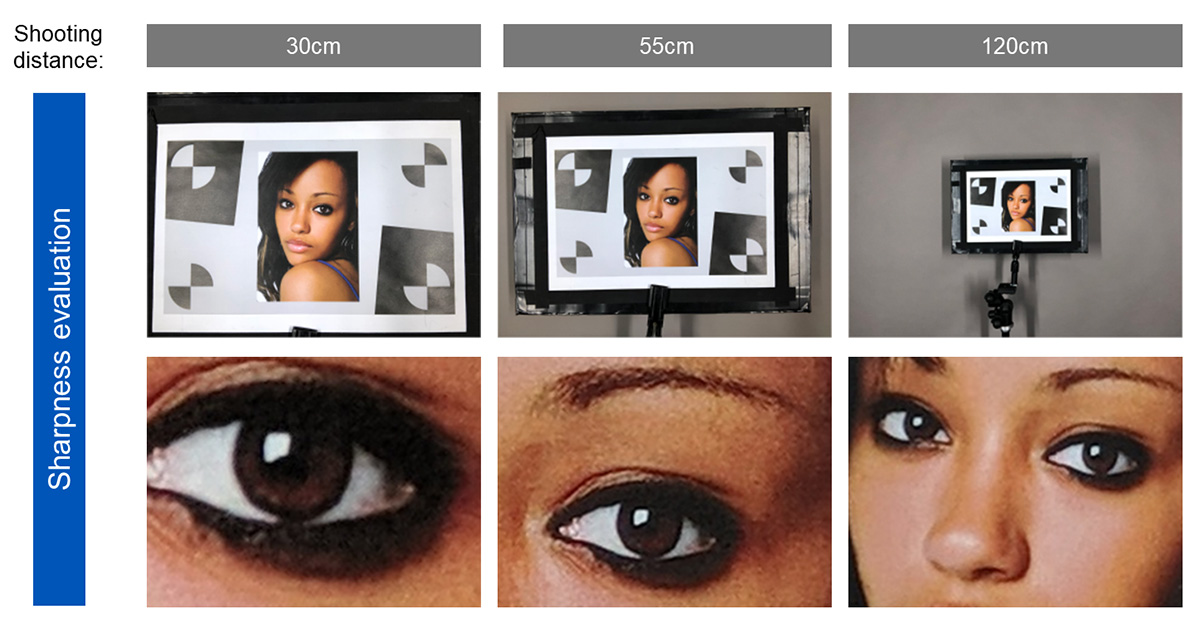
For the Focus sub-score, we use a focus range chart with a portrait in the lab and a number of real-life scenes to measure and analyze the following image quality attributes:
- Focus range
- Depth of field
- Focus repeatability and shooting time (only for front cameras with autofocus systems)
The focus range tells us how good the camera is at focusing on the subject at different shooting distances. In our scoring, we put the most weight on the closer 30cm and 55cm shooting distances, as they represent the largest proportion of real-life use, but we also test at selfie-stick shooting distance (120cm). In addition, we test repeatability and shooting time for phone cameras with an autofocus system by taking multiple shots at the same subject distance and checking the consistency of the results.
In video testing, focus stability is the only temporal attribute we use in focus testing. Not many smartphones come with an autofocus system in the front camera. AF systems can help achieve better sharpness, but can also cause problems in terms of stability while recording.
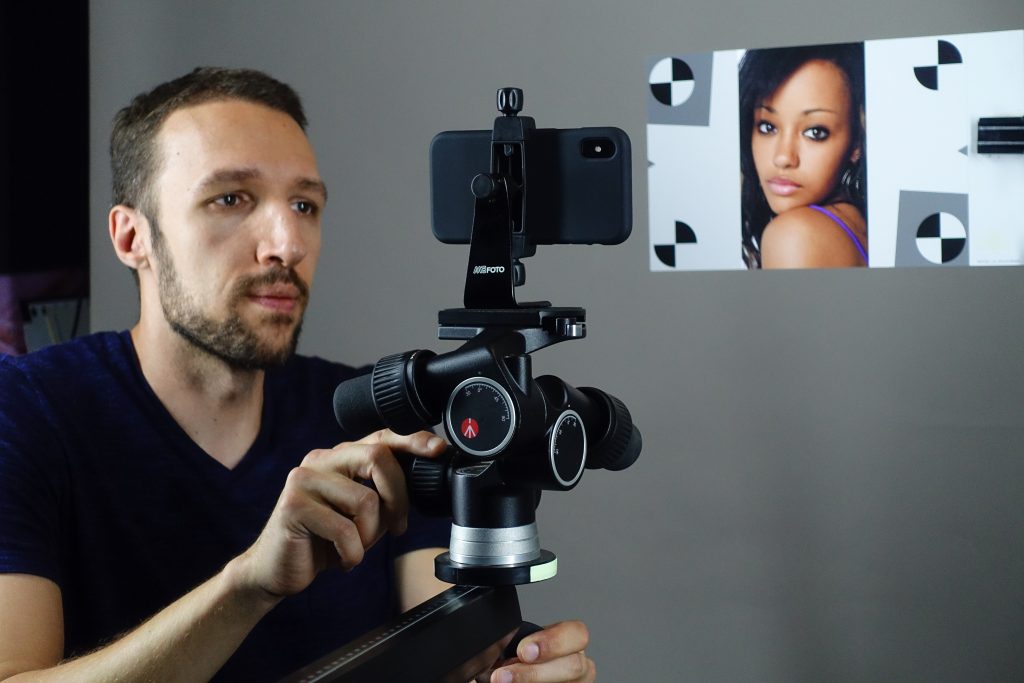
Depth of field is the distance between the closest and farthest objects in a photo that appear acceptably sharp. Good depth of field is essential for images in which the background is an important element—for example, portraits with a tourist site behind the subject, or in group selfies, when we want good sharpness on all subjects, even if they are not in the same focal plane. Depth of field is less important for close-up portraits showing very little background, which is why we put more weight in our scoring on longer shooting distances.
As usual, we perform focus tests at different light levels, and compute scores from objective and perceptual measurements. In the laboratory, we use a focus chart with a portrait image that we capture at three different subject distances.
For our perceptual analysis, we capture individual and groups of subjects at different shooting distances, thus allowing us to check both focus range and depth of field in real-life images.



Texture and Noise
For this sub-score, we analyze images objectively and perceptually to determine how well phone cameras render fine detail and textures, and how much noise is visible in different parts of the image. Texture and noise are strongly interlinked: strong noise reduction in image processing reduces visible noise, but also tends to decrease the level of detail in an image, so the two attributes should always looked at in conjunction. The best camera isn’t necessarily the one with the best texture score or the best noise score, but rather the best balance between the two.
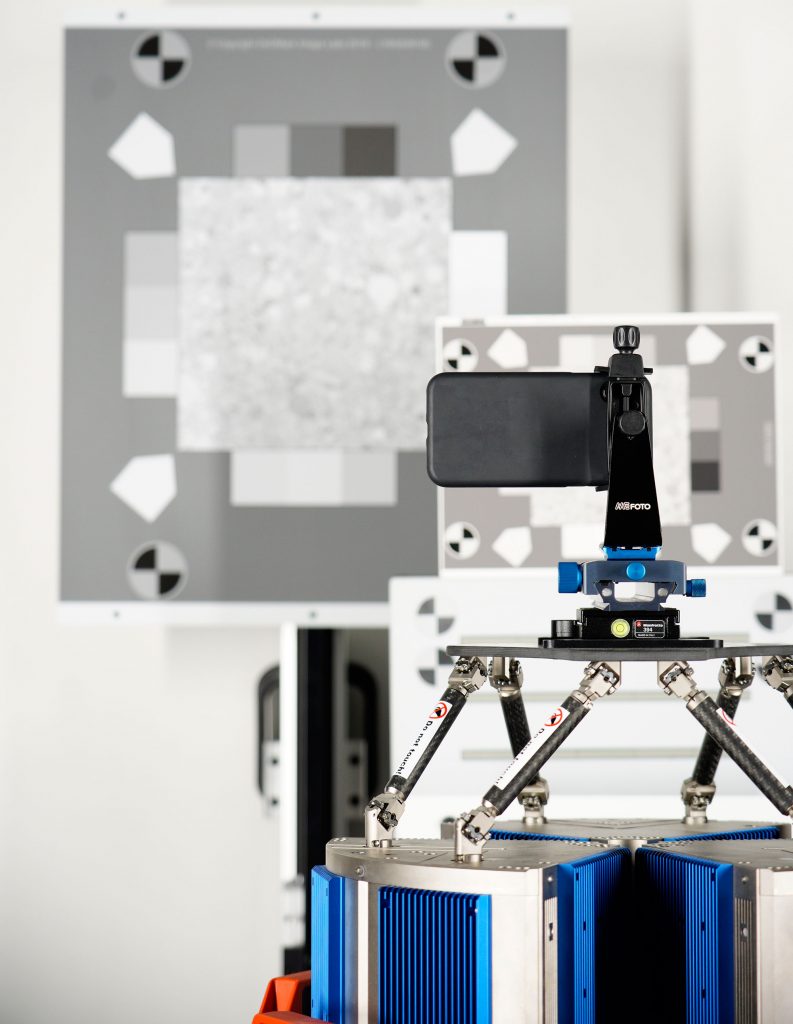
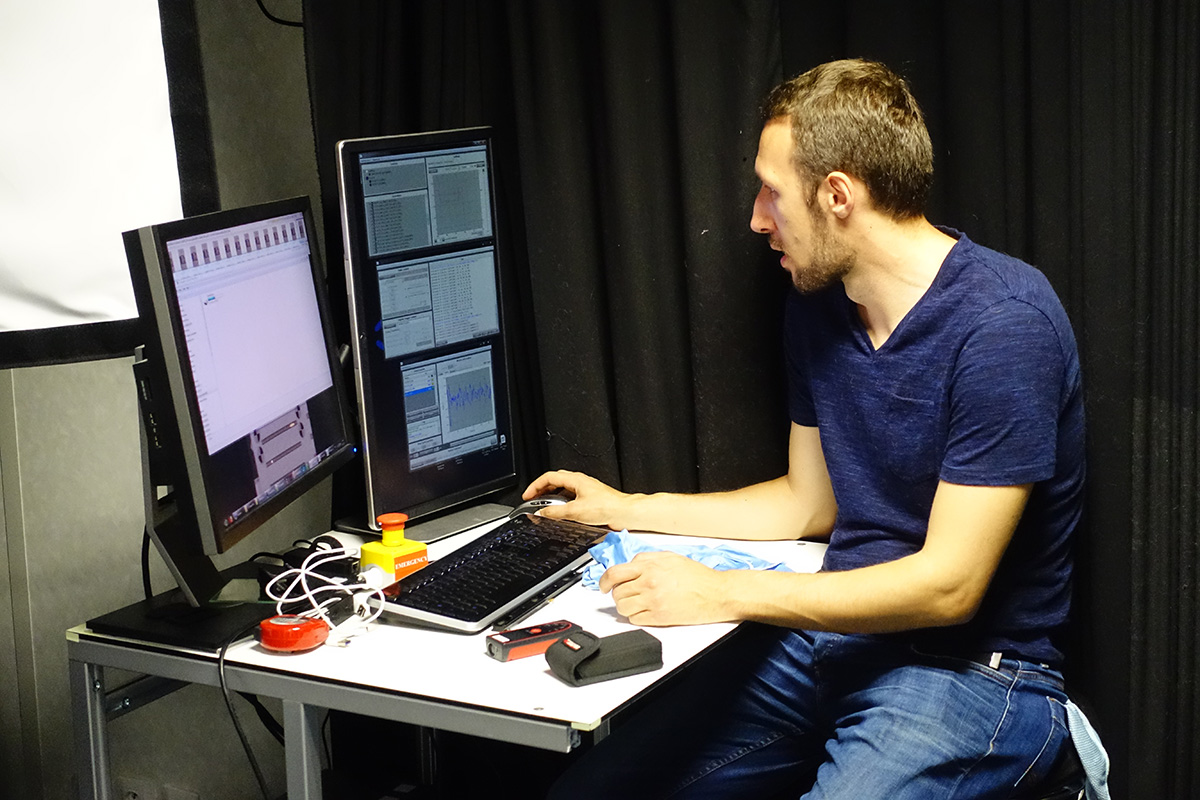
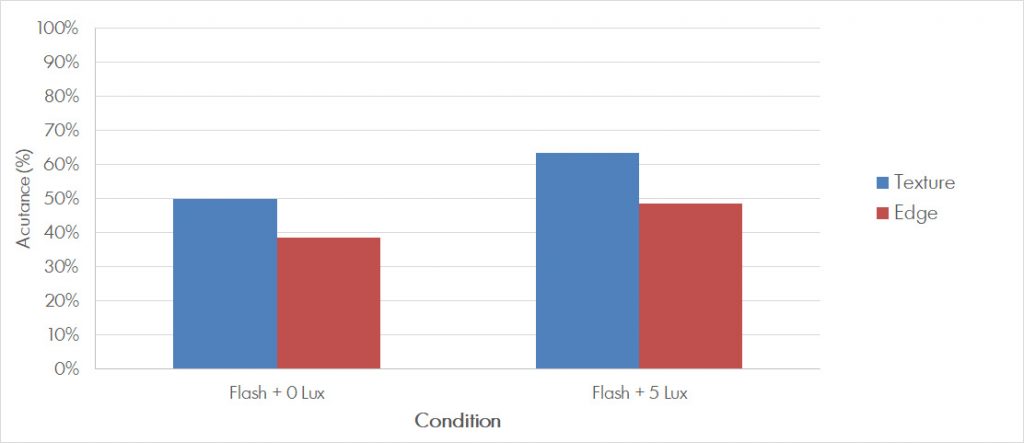
For the Texture and Noise sub-scores, we measure and analyze the following image quality attributes using a Dead Leaves chart and several custom-made lifelike mannequins in controlled lab conditions, as well as using real-life images:
- Texture acutance
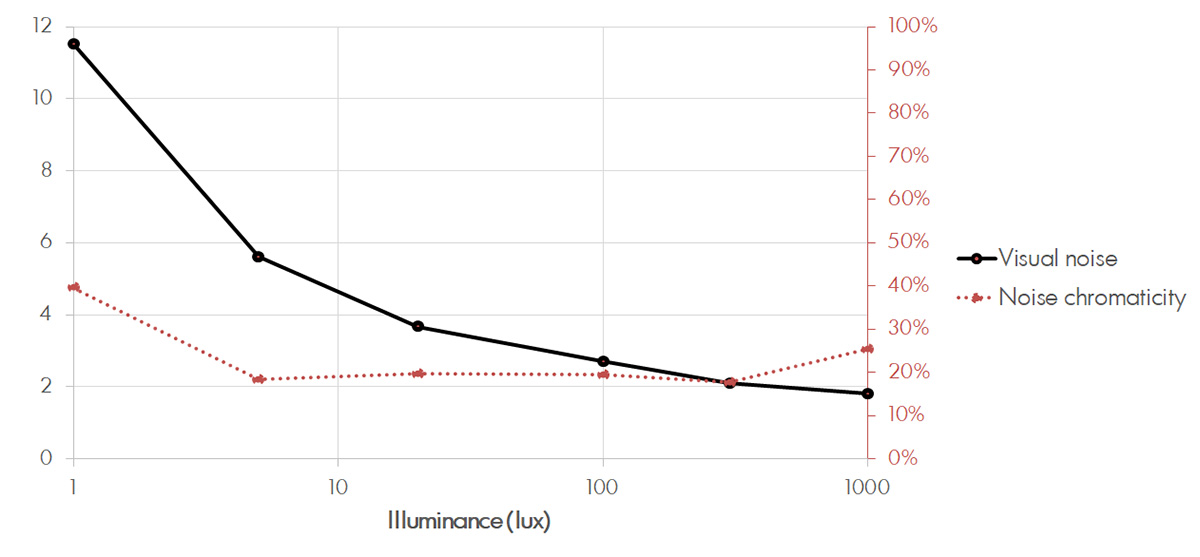
- Visual noise
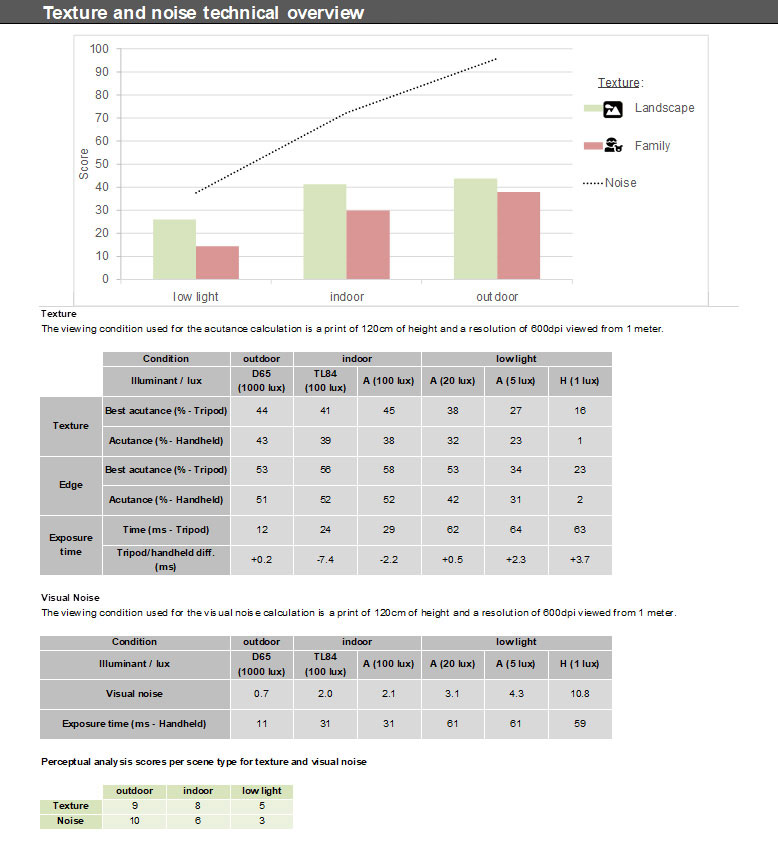
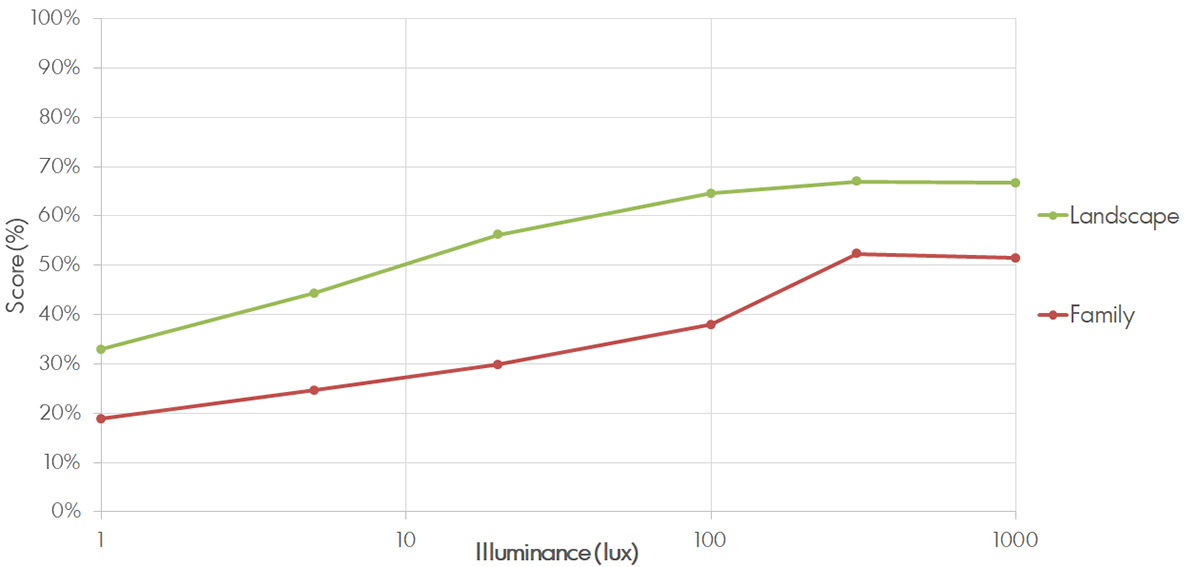
As usual, we undertake all tests at different light levels. In addition, we have designed texture tests for static (landscape) and moving (family) scenes. Moving scenes often pose problems for some cameras, especially in low light, as slow shutter speeds can cause blur on moving subjects or through camera shake (we use an automated hydraulic shaking platform in the lab to simulate the latter).
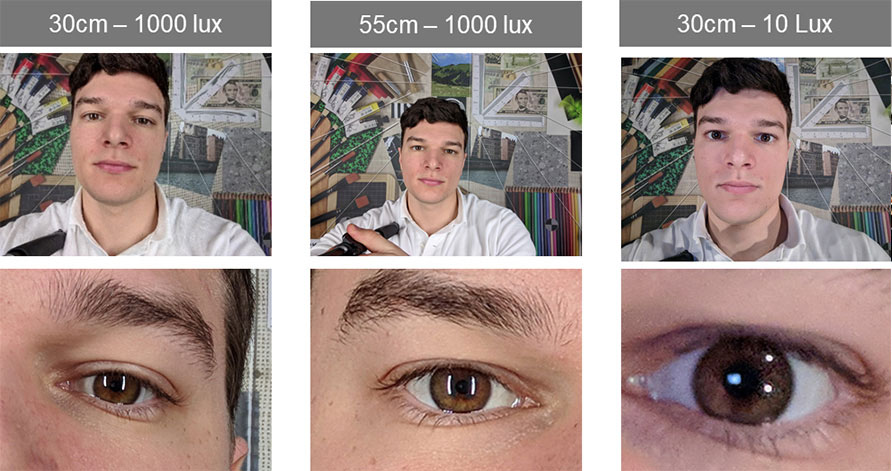
In addition to human subjects, we perform our perceptual analysis using a lifelike mannequin that was custom built for DXOMARK Image Labs. Perceptual analysis focuses on specific details on a face, such as the eyes, eyebrows, eyelashes, lips, and beard. Many device manufacturers choose to apply smoothing effects to the skin of selfie subjects; in the other direction, over-sharpened skin textures and too strong micro-contrast can result in an unnatural rendering of skin detail, so we keep a close eye on both those effects, and also check that skin is rendered in a consistent way across the face.
Artifacts
For artifacts, we use a mixture of objective testing with MTF, Dot, and Grey charts in the studio, and perceptual analysis of real-life images. For our Selfie test protocol, we are looking for the same kinds of artifacts as for our DXOMARK Camera testing (including the ones in the list below), and also for any other unusual effects in our test images:
- Sharpness in the field (corner softness)
- Lens shading (vignetting)
- Lateral chromatic aberration
- Distortion
- Perspective distortion on faces (anamorphosis)
- Color fringing
- Color quantization
- Flare
- Ghosting
The Artifacts section in our technical reports provides an overview of all objective and perceptual measurements. Based on the severity and frequency of artifacts, we deduct penalty points from a perfect score of 100 to compute the overall Artifacts score.



Flash
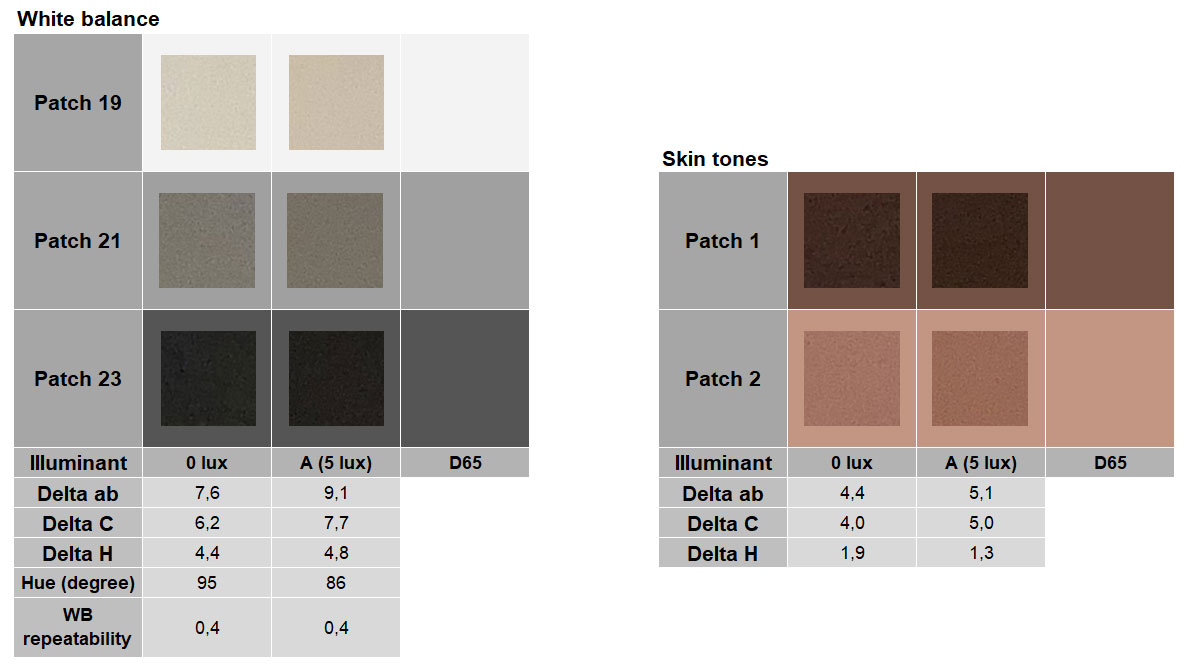
For the Flash sub-score in Photo, we perform a subset of our full Selfie test protocol, looking at most of the image quality attributes that we evaluate for non-flash capture. Along with capturing real-life images in a dark indoor setting, we measure and analyze the following image quality attributes, using Gretag ColorChecker, Dead Leaves, and Gray charts in the lab:
- Target exposure (accuracy and repeatability)
- White balance (accuracy and repeatability)
- Color rendering
- Color shading
- Fall-off
- Texture and Noise
- Artifacts
- Red-eye effect
For these objective measurements in the lab, we shoot at a distance of 55cm at 0 and 5 lux light levels.
For perceptual testing, we shoot with the front camera flash (LED or display flash), manually activated at a distance of 55cm, and at light levels of 0 and 5 lux. We then check the resulting images for exposure on the face, white balance, and rendering of skin color, as well as for noise on the skin and for details on specific elements of the face, such as eyebrows or beard.


Bokeh
Some current smartphone front cameras are capable of simulating the bokeh and shallow depth of field of a DSLR camera. As on main cameras, some models use a secondary lens to estimate the depth of a scene; others rely on a single lens and use purely computational methods to analyze depth. We test bokeh simulation in a laboratory setup, looking at both the quality of the bokeh (depth of field and shape), as well as at the artifacts that are often introduced when isolating a subject.
For the Bokeh sub-score, we measure and analyze the following image quality attributes:
- Equivalent aperture (depth of field)
- Depth estimation artifact
- Shape of bokeh
- Repeatability
- Motion during capture
- Noise consistency
For Bokeh, we evaluate all images perceptually, using test scenes in the studio as well as indoors and outdoors. We designed our test scenes to replicate a number of light conditions and to help experts evaluate all the image attributes listed above.



Video Stabilization
Stabilization is just as important for front camera video as it is for main camera video. We test video stabilization by hand-holding the camera without motion and by shooting while walking at a subject distance of 30cm and at arms-length. For video calls–one of the most important use cases for front camera video—users typically hand-hold the device close to their faces (30 to 40 cm). For this kind of static video, the stabilization algorithms should counteract all hand-motion, but not react to any movements of the subject’s head.
For group selfie videos, we have to check that stabilization works well for all the faces in the frame. In the sample below, you can see that only the main subject’s head is well-stabilized, and that there is noticeable deformation on the other subjects in the video.
Walking with the camera is the most challenging use case for stabilization systems, as walking movement has a strong amplitude which requires much more heavy-handed stabilization than a static scene. Inefficient video stabilization in such cases can often result in intrusive deformation effects.
We hope you found this overview of our front camera still and video testing and evaluation useful. For an introduction to our new DXOMARK Selfie test protocol, an article on the evolution of the selfie, and even more information on how we test and evaluate front camera video quality, please click on the following links:



DXOMARK encourages its readers to share comments on the articles. To read or post comments, Disqus cookies are required. Change your Cookies Preferences and read more about our Comment Policy.